Saturday, May 29, 2010
Motorized Bicycle (Test Run)
So the bike is now 100% assembled (minus motor). I gave it a quick ride around the block to make sure I actually put it together correctly, and surprisingly, I did! One issue though, the clear coat on the rims and the rubber brakes do not like each other at all. Whenever I apply the brakes they let out this awful squealing sound. They also left nasty black circles on the rims :(. Sadly I'm not in possession of my camera at the moment, so no pictures available. Motor should be here sometime today, can't wait!
Sunday, May 23, 2010
Motorized Bicycle (Assembled!)
Finally got it all together! Well, the basics at least. Still needs the brakes put on, a new chain, and most importantly, the engine! Not to mention the headlight, taillight, turn signals...still a ways to go. But until then, I think I'll sit back and enjoy the view :).


Motorized Bicycle (Garage Sale!!)
 Picked up a HUGE headlight, two small turn signals, and an ignition switch at a garage sale for only $7.50! The plan is to gut the headlight and see if it will be possible to load it up with LEDs, giving me a lower operating voltage and overall lower power consumption. The ignition was really a impulse buy, not sure if it will be used or not. Once the bike is finished I will be switching gears to tricking it out with accessories, really pushing it into the realm of 'badass'.
Motorized Bicycle (More painting!)
I finally have the main components of the bike frame painted and reassembled. I've switched the overall theme of the bike from "G ride" to "total badass". So with that in mind, I went for a deep gray for the frame, lowered the seat, and flipped the handlebars; it gives it a pretty nice cafe racer feel. The only things left to take care of as far as painting is concerned are the hubs and the wheels. I found that the whitewall on the tires needed much more than just a little cleaning, so I decided to repaint them. Some quick painters tape reinforced with duct tape and I was ready to go.
 And to accent the white, I figured bright red hubs would look pretty solid.
 I'm hoping that I should have the bike fully reassembled tonight or tomorrow. I'll be ordering the motor tonight, and will hopefully that this guy ready to ride next weekend!
 I've switched the overall theme of the bike from "G ride" to "total badass". So with that in mind, I went for a deep gray for the frame, lowered the seat, and flipped the handlebars; it gives it a pretty nice cafe racer feel. The only things left to take care of as far as painting is concerned are the hubs and the wheels. I found that the whitewall on the tires needed much more than just a little cleaning, so I decided to repaint them. Some quick painters tape reinforced with duct tape and I was ready to go.
 And to accent the white, I figured bright red hubs would look pretty solid.
 I'm hoping that I should have the bike fully reassembled tonight or tomorrow. I'll be ordering the motor tonight, and will hopefully that this guy ready to ride next weekend!
Thursday, May 20, 2010
Motorized Bicycle (Disassembly / Sanding / Painting)
Managed to get the bike disassembled, and surprisingly it wasn't all to difficult.
 That's not to say that I didn't run into any problems, it wouldn't be right if Captain Retard didn't make an appearance. In this case, it was during the removal of the chain. You are supposed to use a tool to push out this pin that will loosen the link, and thus separate the chain. So I did not own this tool, but I was determined to do without. The hex wrench was first up. I figured if I used one of the smaller sizes, I could use the same concept as the tool and push a pin through. No luck. My next great idea was the power drill. If I can drill out rivets and stripped screws, why not a chain pin? Here comes the genius, I used the tire itself as the support for the chain. Woosh! Here comes Captain Retard! The drill slipped and punches straight through the tire and the tube. As if the realization of what just happened wasn't enough, the loud hiss of air escaping calming reminds me of my mishap for another 20 seconds. Thankfully, it only cost me about $6 each for the chain tool and a new tire tube, lesson learned.
I had recently mentioned that I was fond of the dark green / white combo. It wasn't awful, but I think I can make it look much more badass. The only problem is that I haven't decided on a color scheme yet :\. Color scheme or not, I'm moving forward! I got myself some 0000 grade steel wool and gave the bike a once over. I wasn't all too concerned with stripping the old paint off, I only needed to scuff up the paint enough so that the new coat will stick.
Once that was taken care of, it was time to assemble my make shift paintbooth.
 Consisting of some paper/plastic sheet from the hardware store propped up against a tree, my paint booth was finished in a solid 30 seconds. I'm gonna put on 3 coats of a dark gray primer, sanding between each coat. Should give me a solid foundation, now if I only had a color scheme picked out!
Monday, May 17, 2010
A quick recap (arcade cabinet conversion)
So I had already finished this project prior to the creation of this blog, so I'm not really gonna go over any details, but I figured I would post some pictures and give a quick backstory for those interested.


Pretty much I had casually mentioned at work that I was interested in building a MAME cabinet. A co-worker over heard me, and just happened to have one that he was looking to get rid of, as in FREE! So after a long drive and some painful hauling I was in possession of a Wizard of Wor, cocktail styled arcade cabinet.
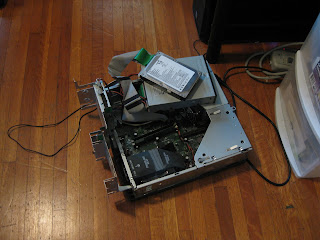
I had been given an old PC from my girlfriends family, with the help of a specialized boot CD, I had a fresh install of DOS 7 as well as an emulator and front end.

On the hardware side, it was fairly simple to make the conversion from PC to arcade cabinet. The video input to the monitor was simple a VGA connection with composite sync and a slower refresh rate. Twisting the hsync and vsync lines together gave me the composite sync signal, and the software took care of the refresh rate. For the audio, I simply bought some $2 computer speakers at Goodwill (Woooo Goodwill!) and connected the speakers in the cabinet to the driver board inside the speaker enclosure. The keyboard was a bit tricky, I removed the controller board from inside the keyboard, and traced the signals from the necessary keys (up, down, left, right....). I then wired the buttons from the arcade to the corresponding pins on the controller board, and it worked like a charm!
The only problem that I ran into was the fact that the monitor had to be turned on AFTER the computer booted into the front end, otherwise the picture wouldn't sync properly. This caused the screen the rip diagonally, making it pretty much useless. Once I found this out, and by find out I mean I accidentally stumbled upon it, it was smooth sailing.
One feature I'd like to add in the future is the ability for the game to save hi scores, but this would require a newer, non DOS version of the MAME emulator. While this would be nice, I think a whiteboard hung on the wall next to it will have to do for now :P.

Motorized Bicycle (The Beginning)
After stumbling upon a post over at MAKE, I was instantly won over by the idea of converting a bike over into a moped. I browsed around on craigslist and managed to pick up this bad boy for $80.
 I had originally planned on completely sanding it down and repainting it, but I'm feeling pretty fond of the dark green and white combo. It's my hope that I will be able to trick this thing out, and make it as much of a "G ride" as possible. So far I'm looking to replace the original seat with a banana seat of the same color and flip the handle bars to give it a cafe racer feel. As for some advanced mods, I'd like to add a head/tail light, as well as turn signals. It's gonna be legit (hopefully). Should be ordering the seat and engine in the next week or so. I'll be sure to post updates as they come!
 I had originally planned on completely sanding it down and repainting it, but I'm feeling pretty fond of the dark green and white combo. It's my hope that I will be able to trick this thing out, and make it as much of a "G ride" as possible. So far I'm looking to replace the original seat with a banana seat of the same color and flip the handle bars to give it a cafe racer feel. As for some advanced mods, I'd like to add a head/tail light, as well as turn signals. It's gonna be legit (hopefully). Should be ordering the seat and engine in the next week or so. I'll be sure to post updates as they come!
Subscribe to:
Posts (Atom)